How to Make the Best Coffee while Camping – 6 tested Methods
As an Amazon Associate, I earn from qualifying purchases. Please note that a few of the links in this article are actually affiliate links. This means that if you click on them, I will get a commission, without any extra cost to you. I only recommend products or services that I personally tested and highly recommend.
There’s something about holding a cup of coffee and looking out over the wilderness, a mountain, a beach. It’s quite a serene way to travel.
Clare, from The Hiking Adventure, gets it. She also gets that making coffee while camping or when you’re on overnight hikes isn’t as easy as plugging in a coffee maker.
If you’re camping and don’t have access to a coffee maker, Clare writes how to make coffee while camping. Many of these will work on a long road trip as well.
A lot of campers will wax poetic about the smell of pine needles in the morning. For me, it’s the smell of my first cup of morning coffee that gets me excited.
My real-world routine kicks off every morning with freshly brewed coffee and my body simply refuses to accept backpacking as a valid excuse to forego this.
And really, there’s no reason to. If you had a team of porters carrying an espresso machine and a generator you’d be able to make great coffee. But, if you’re all out of porters, there are still some really cool and different ways to make a decent cup of coffee while camping or backpacking.
Having the right gear is important but so is knowing what it takes to make a decent cup.
The reality is that if you want coffee on your next hike, someone’s got to carry a few extra pounds. There’s probably a graph somewhere that plots caffeine levels vs extra pack weight but, in the absence of that, you’ll need to guestimate how many cups per mile you’re going to need.
How to Make Coffee While Camping

Instant Coffee
Sadly, we have seen some campers haul out instant “coffee” in the morning. “It’s so convenient and it tastes just like the real stuff.” they’ll say.
But why bother?
You could have stayed at home and watched the Nature Channel instead of heading outdoors. It’s pretty much the same thing, right?
Right? Just because we love the outdoors doesn’t mean we have to live like savages.
If you want the best coffee while camping you’re going to need proper ground coffee and a way to brew it conveniently.
Why ground coffee? Surely taking coffee beans along would be better?
It would, but then you’d also have to carry a manual coffee grinder along with you. Also, beans don’t pack as compactly as pre-ground coffee does. If you grind the beans just before you leave home and store them in an airtight container they’ll still make a decent cup a few days later.
You’re going to need around 2 tablespoons (0.38 oz) of ground coffee for every half pint cup of coffee. Do the math and start grinding.
Bean & Bean Coffee makes disposable dunk and steep coffee bags that work similarly to tea. You can lightly pack your own coffee bags, and it’s an easy way to make flavorful coffee that’s not the old instant coffee for camping.
How to Make the Best Camp Coffee
Once you’ve got your ground coffee it’s time to decide on your brewing method. Your options are limited to the following camping coffee brewing methods:
Old School Backcountry Method
If you want the true cowboy method experience you could throw the ground coffee in your pot, give it a stir and heat up the water.
After a while, pour off the coffee with as few of the grounds as possible ending up in your cup.
You could pour the brew through a bit of cloth or a coffee sock to filter out the grounds if you prefer your coffee less chewy.
A variation on this method is to tie the grounds up in a filter and cook it up in the pot. You’ll avoid the sludginess but the poor extraction of this method will always leave you with thin tasting coffee.
Playing your harmonica while waiting for your brew isn’t essential but it does add to the authenticity of the cowboy coffee method. experience.
This might be the easiest way to make coffee while camping, but may not be the tastiest.
For..
- Cheap & Simple
- No extra coffee equpiment to carry
Against…
- Can be sludgy unless you DIY filter it
- Can result in divorce if you use your sock to filter
Brew in cup
If you’re not that impressed with the flavor of coffee strained through a sock you could go for a brew in cup solution like the MSR MugMate.
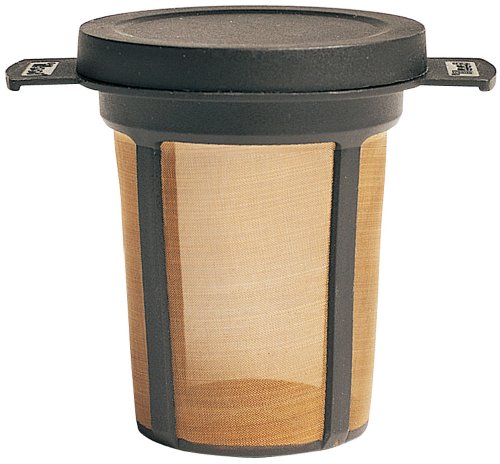
It’s a mesh stainless steel filter that fits into one of your coffee mugs. Throw the coffee grounds in the filter, put the filter in your mug, and add hot water from your Jetboil.
It’s essentially a French press coffee brew with less moving parts and in a far more convenient package. It’s also environmentally friendly because there aren’t any paper filters to dispose of after you’re done.
If you’re trying to keep your pack weight as low as possible then this is probably your best way. It’s also ideally suited for individual use because it’s no good if you’re trying to make a few coffee cups at once for the rest of your party.
This method isn’t going to give you the best cup of camp coffee but it’s way better than anything those cowboys were drinking.
For…
- No paper filters – reduced waste
- Easy to use
Against…
- Single cup brewing only – when is one cup ever enough?
- Sub-optimal flavor extraction
Pour-over Coffee Method
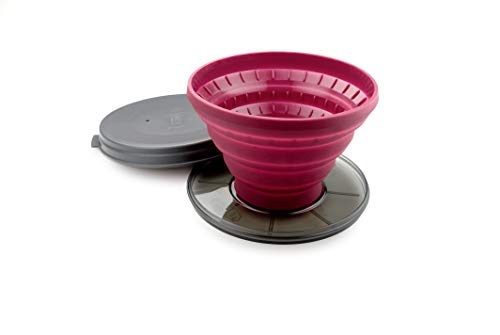
If you get your timing and technique right then the pour-over method can give you a great cup of coffee. You’ll need a filter, something to hold it, and a steady hand while pouring the hot water over your coffee grounds.
Making a pour-over cup calls for a little patience though. Instead of dumping all the water in at once you pour water over coffee a little at a time, the way your drip coffee maker at home would.
Probably one of the best drip coffee makers for backpacking is the GSI Outdoors Collapsible Java Drip. It has a collapsible silicone filter holder that takes up to a number 4 filter. It allows you to make anywhere between 1 and 12 cups of coffee at a time.
While you technically could make up to 12 cups with this nifty coffee maker, it’s not going to be a very strong brew. Also, because you’re pouring the water over slowly, the coffee can get cold.
You’re better off making two batches if you prefer a richer cup. It’s ideal though if you’re just making one or two cups.
Stovetop Percolator
If you’re making coffee for large groups then stovetop percolator coffee is probably your best bet.
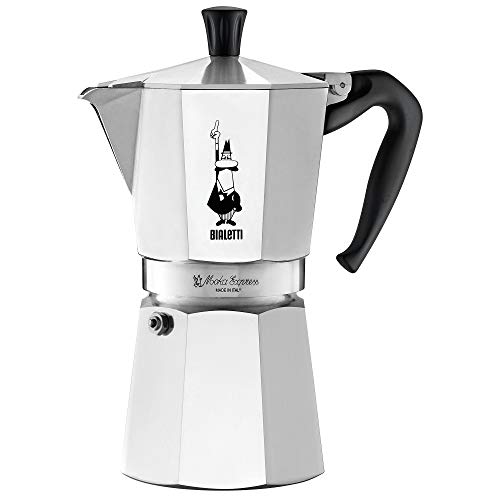
Coffee grounds go in the top, the water boils in the bottom when you pop it on the fire or camp stove/burner. It’s easy to use and there’s no fussing with paper filters either because most of these use their own built-in filter.
We love the Bialetti Mokka Express 9-cup percolator. If you’re looking for a slightly cheaper option then the stainless steel Yosemite 8-cup percolator also makes great coffee.
These also work well on how to make coffee on a camp stove.
Besides looking great, a good stove top percolator makes rich tasting coffee with a fuller taste than any of the previous methods give you. It’s a heavy-duty piece to include in your coffee camping kit so it’ll survive the bangs and scrapes of the outdoors.
Both of these percolators weigh just over 2 pounds though and they’re fairly bulky. This makes them better suited to making camping coffee rather than a backpacker coffee option.
I love coffee, but not so much that I’d be willing to walk for days with one of these in my pack.
For…
- Makes great tasting coffee
- Makes multiple cups at once
- No disposable filters
Against…
- Heavy and bulky – not a great option for backpacking
Mini Espresso Maker
To make a decent shot of espresso you need around 15 to 18 bar of pressure to force the hot water through the coffee grounds. Your machine at home uses an electrically powered compressor to generate this pressure.
Of course, that only works if you’ve got access to a power outlet. Fortunately, you now get some hand powered mini espresso makers that actually make a really decent shot of espresso.
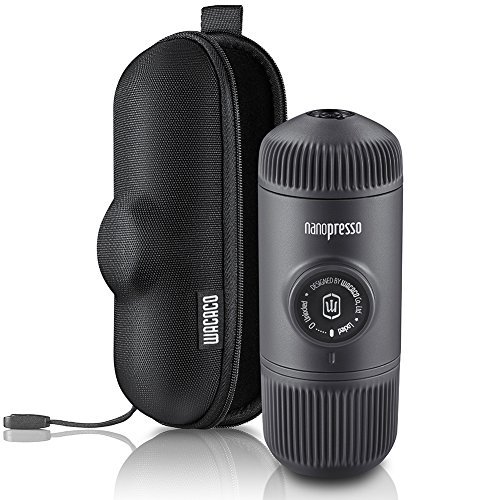
They’re all shaped like a mini thermos and follow pretty much the same principle: add tamped down coffee grounds into the basket, add hot water in the water tank, screw it all together and then pump the handle or button a few times until the coffee starts to come out.
If you’re considering getting a portable espresso maker then don’t bother with the cheap ones. They don’t generate enough pressure and break pretty quickly.
The Wacaco Nanopresso or the cheaper Litchi Portable Espresso machines are both good options. Again, these are great if you’re making yourself a quick shot but not suited to making any for the rest of your group.
Also, there are a few different parts that need to be assembled each time you make a shot of espresso. But hey, if you need your fix, this will do the job nicely. The small form factor also makes these easy to pack.
For…
- Makes a great shot of espresso
- Fairly light and small – great for backpacking
- No disposable filters required
Against…
- Only makes a single shot at a time – not good for groups
- You get what you pay for!
Aeropress
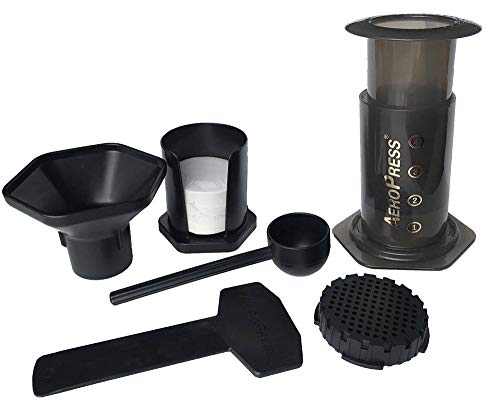
The Aeropress Coffee Maker is probably one of our favorite ways to make coffee out hiking.
The complete immersion of the coffee grounds and the pressure you generate when pressing the plunger down, combine to make really good coffee. The simplicity and ruggedness of the design make it ideal for outdoor use.
You only need the plunger, cylinder and filter basket. Leave the rest of the bits and pieces it comes with at home.
It also hits that sweet spot when it comes to brew quantity. You can make anywhere between 1 and 4 shots of espresso. That’s perfect if you’re hiking individually or as a pair. It does use single use paper filters but you could buy the optional steel filter if you don’t feel like dealing with the used filters.
The steel filter also lets more of the oils through than the paper filters do so you get an even better cup. Also, it’s worth practicing a little at home and getting the inverted method under your belt.
Just make sure you’re working on a level surface. We’ve had our fair share of Aeropress mishaps and the sight of spilled coffee is just heartbreaking. Especially when it’s the last of your ground coffee. And you’re 40 miles from the nearest Starbucks. Long story.
For…
- Makes awesome coffee
- Durable construction
- Brews enough for 1 to 2 people
- Easy to pack
Against…
- Takes a little practice to get it just right
- Few different loose pieces – easy to lose
How to Make coffee on a camp stove
Making a good cup of coffee while camping is an essential skill for any hiker or outdoorsman. With only one burner on a camp stove, making the perfect cup of joe can be difficult – but it is not impossible! Here are some tips and tricks to achieve that delicious brew even in the middle of nowhere.
Start by boiling water on your single-burner camp stove. Once the water comes to a rolling boil, turn off the heat and add about two tablespoons of ground coffee for every eight ounces of liquid. Let the grounds steep for about five minutes and then remove them from the liquid with a spoon or ladle. This will create a strong base to make your favorite kind of coffee: pour over method, cold brew, French press, etc.
The trick to making great coffee while camping is being prepared ahead of time. Pack all your supplies and materials before you leave so you don’t forget something important like sugar or creamer! Additionally, pre-measuring your coffee grounds will save time and give you an easier time cleaning up afterwards.
With some practice and patience, you’ll be able to make a delicious cup of coffee no matter where you are!
How to Pack Coffee for camping
When packing for camping, coffee is a great beverage to bring along. Not only can it energize campers on those early morning hikes, but making coffee while camping can be a surprisingly enjoyable experience.
First, choose the type of coffee you’d like to use – whether that’s pre-ground or whole beans – and make sure to take enough for everyone in your group. >continue writing with how to pack the coffee for freshness
Pack the coffee in an airtight container, like a mason jar or sealable bag. If you’re bringing whole beans, use a grinder so that your coffee is freshly ground just before it’s brewed. To ensure maximum freshness, pre-ground coffees should be consumed within two weeks of being ground.
Before packing the container, try to let the aromatic oils settle on the coffee grounds; this will help maintain freshness longer. If you’re packing a French press or other type of coffee maker, make sure to include it in your bag for easy access and quick preparation when you reach your destination.
Lastly, don’t forget to bring along some sugar or sweetener and milk
Whether you’re looking for a caffeine boost on a long hike or just want to enjoy some quality time by the campfire, having coffee while camping is an ideal way to make the most of your outdoor adventure. Make sure you take all the necessary supplies – like cups and spoons – so that you can make and enjoy coffee while camping!
Caffeinate your Campsite
As with any campsite cooking, making coffee on the trail is going to involve cutting some corners.
You’re not going to get the same super-rich espresso that the hipster barista at your local coffee spot manages to deliver every time but you can get close.
Regardless of the camp coffee gear or method you choose, there are a few critical things to get just right for optimal results.
- Quality of your beans – You can’t make good coffee with lousy beans. Make sure you get your beans a reputable roaster that knows what they’re doing.
- Grind size – The coarseness of the grind determines how much of the surface area of the coffee is exposed to the water. The finer the grind, the more exposed surface area and better extraction you’ll get. The limit of the grind size you’re after is determined by the method and filter you’re using.
- Freshness of coffee – Make sure the beans you bought were recently roasted and only grind them just before you pack for your trip. Make sure you store the coffee in an airtight container to keep it fresh.
- Quantity of coffee per cup – Tastes vary but you want to be aiming in the 2 tablespoons of coffee per half pint of water.
- Water temperature – The Goldilocks zone for the water temperature is between 195F and 205 F. Do not use boiling water (212 F) or you’ll just end up with burnt coffee. Water that’s too cold won’t give you the flavor extraction you’re after. This is easier if you are using an actual stove rather than an open fire
- Brewing Method – Brewing a good cup of coffee is part science, part art. The fast and dirty brewing methods will never give you a good cup. If you’re a coffee snob opt for a stovetop percolator, Aeropress or a well-executed pour-over.
- Wetting / Blooming – Even if you’re not doing a pour-over brew, it’s a good idea to pour just a little water on your grinds to begin with. Just enough to wet them. They’ll expand and swell (bloom) a little and get rid of some of the carbon dioxide in the coffee and you’ll get a less bitter cup.
Got Milk?
If you’re less of a purist and normally order cappuccinos or lattes then you’re going to be a little harder to please. If you’re camping then maybe there’s space for some long life milk (UHT) but the taste is just never the same. If you really can’t handle coffee without milk then your best option is to pack some coffee creamer. Remember, you’re supposed to be roughing it.
How About A Spot Of Tea?
So maybe you prefer your caffeine delivered the old-fashioned way. In tea. Tea bags present the same challenge that paper filters do. What do you do with them once you’ve used one? You could dry them out and burn them in your campfire but your only other option is to hike out with them.
A better option is to pack some loose leaf tea. The British will tell you that’s the only right way to make tea anyway. A brew in cup solution like the MSR MugMate is ideal for brewing tea while camping. Just remember to bury the used tea leaves or scatter them far enough away from your campsite so you don’t attract any unwanted visitors.
Besides getting your outdoor coffee making skills polished you’ll also need to consider a few other factors before deciding which method is going to work best for you:
For…
- Cost – Are you happy to use a $2 filter holder for your pour over coffee or are you willing to spend $30 or $40 on something a little fancier? Some backpacking mess kits come with a basic coffee attachment
- Filters – If you’re going with an option that uses paper filters you’ll have to carry them out with you or burn them in your campfire. Leave no trace.
- Group size – Are you just making some for yourself or will you be on coffee duty for a group of people?
- Size and weight – If you’re camping then you might be ok with something a little bigger and heavier. Your backpacking coffee solution should preferably be light and easy to slip into your pack.
Some Environmental and Ethical Issues
Besides choosing a brewing method that works for you, it’s worth sparing a thought for the ethical and environmental implications of your choices.
Buying ethically sourced coffee that’s grown in an environmentally responsible way takes just a little research and can have significant impacts.
Choosing a brewing method that doesn’t require disposable filters is not only a more sustainable choice but saves you the hassle of disposing of or hiking out with more waste.
When you’re getting rid of your coffee grounds you’re also better off burying them or scattering them a fair distance from your camp.
You’re not the only one that likes the smell of coffee. If you want to keep your campsite bear and critter free then get rid of those grounds properly.
Final Thoughts
If you know how to make a good cup of coffee at home then there’s no reason why you can’t do the same in the great outdoors.
Some of your options may be limited depending on how light you’re traveling and how long you stay in one spot. If you’re camping then you could probably get away with a bigger, bulkier coffee brewing solution like a percolator.
If you’re backpacking and want to keep it light you’re probably better off with an Aeropress or a simple pour-over. Whatever you do, just don’t go over to the dark side. Drinking instant coffee will always disappoint and will rightly earn you a few raised eyebrows from your fellow hikers.
If you start with some really good, fresh ground coffee and get your water temperature right then chances are you’re going to have a great start to your day.
FAQ Camping Coffee Hacks
What kind of coffee should I bring camping?
When camping it is best to bring a pre-ground, medium roast coffee. This will help ensure that you have a consistent cup of coffee every time.
What is the best way to make coffee while camping?
One of the simplest ways to make coffee when camping is to use a French press. This method requires just hot water and ground coffee, making it simple and easy to make delicious campfire coffee
How do I keep my coffee warm while camping?
You can keep your coffee warm by keeping it in an insulated mug or thermos. This will help keep your coffee at a consistent temperature and keep it warm for longer periods of time.

You might also like:
How to Road Trip and Travel in a Campervan
Step-by-step guide to renting an RV with RVShare
How to Go Camping without an RV
How to make the best coffee while camping
Camping Experiences Everyone should have
Best Places to Camp this Winter
Essential First-Time Camping Things to Know
How to have electricity on the road
Camping Cookbooks for Outdoor Survival